本文篇幅较长,为了阅读方便,开头加上了可与文章内容相互链接的标题(可双向跳转)
建立博客对我来说是一件新奇的事物,尤其是还能在原本空空如也的界面内加上许多有意思的功能,而为了实现各种各样的功能,我们需要查阅许多大佬的文章,在这些过程中我们会遇到各种各样的问题,而解决这些问题的过程就是提升的过程。在此尤其要感谢分享自己建站教程的博主大佬们。
对博客的各种折腾是我的一种精神追求,而对我来说,能将我对 Next 主题的个性优化中所用的方法记录并分享出来是一件令人愉悦的事。文中方法源于互联网中的大佬,并依据实际情况有所改动。
随着互联网的普及,个人博客的数量也越来越多,网上用来搭建个人博客的框架大多是 Hexo,Hexo 有许多主题,其中 Next 主题是 Github 上 Stars 最多的主题。我浏览过许多博主的个人博客,发现这些博客大多源于 Next 主题。 Next 背后有着一个专业且默默奉献的团队,主题在不断更新,出现的问题其后的团队也会尽快解决,配合上 Hexo 强大的插件,我们便能利用 Hexo + Next 打造出一个属于自己的个性超赞博客!
本文将为你详细地展现最新的 Hexo 博客的搭建过程和 Next 主题的安装与配置以及现拥有的相关个性优化。值得说明的是,我是一个很白的小白,能写出这篇文章的底气不过是源于实际操作得到的结果,以及许多大佬的相关详细教程,倘若你也是一个小白,那么不用怕,跟着本文一起做,你也能拥有一个超赞的博客啦!
若有大佬赏阅本文,文中方法有所不足还请见谅!若能指出不足,亦或提出更佳的优化方案,在下感激不尽!
文中所参考的各种方法会给出相关来源链接,由于参考文章过多,有些链接未及时收藏,若有遗漏,欢迎指出。
在此建议:将博客每一步所采取的方法步骤大概记录下来,比如添加亦或修改了哪个文件,并把相关文章收藏整理下来,这样以后想修改相关功能时,心中能更明确应改动哪部分文件;此外这还利于进一步调整优化博客,以及博客功能的更新。若在网上发现了令你眼前一亮的个性超赞博客,一定要记得收藏,且这类博客的博主一般会有讲述其博客的搭建历程。
网上关于 Next 主题优化的好文章有很多,但随着 Next 主题的更新,总有些教程会过时从而失效亦或有更好的优化方法(一些功能会成为 Next 主题自带的一部分,或被主题抛弃)。本文的一些方法同样会因过时或方法本身的错误而导致无法达到预期效果,故而文中内容仅供参考。倘若遇到无法解决的问题,请参考 Next 官方文档相关说明或前往 Next 的 Issues 区查询或提交相关问题。
搭建 Hexo 需具备 Node.js 和 Git 两种环境,具体安装方法网上有很多,在此给出我遵循的教程:
注意:安装时最好前往官网获取最新版本,否则后续步骤可能出错。(Node.js 使用长期支持版即可)
打开 cmd ,分别输入 node -v 和 npm -v 以及 git --version,确保相关环境搭建成功。如果出错请百度或谷歌相关问题。
下面给出我的操作环境:
1
2
3
4
5
6
| $ node -v
v12.16.1
$ npm -v
6.13.4
$ git --version
git version 2.25.1.windows.1
|
网上关于如何搭建 Hexo 博客的教程有很多,因此我在该节只是简略介绍 Hexo 的搭建,同时附上搭建后的心得。
安装过程可直接参考 Hexo 官方文档。可输入hexo v获取版本信息:
 1
 2
 3
 4
 5
 6
 7
 8
 9
10
11
12
13
14
15
16
17
18
19
20
| $ hexo v
hexo: 4.2.0
hexo-cli: 3.1.0
os: Windows_NT 10.0.18363 win32 x64
node: 12.16.1
v8: 7.8.279.23-node.31
uv: 1.34.0
zlib: 1.2.11
brotli: 1.0.7
ares: 1.15.0
modules: 72
nghttp2: 1.40.0
napi: 5
llhttp: 2.0.4
http_parser: 2.9.3
openssl: 1.1.1d
cldr: 35.1
icu: 64.2
tz: 2019c
unicode: 12.1
|
安装好 Hexo 后,选择一个目录并新建一个文件夹,用来放入有关 Hexo 的所有文件。(因之后需要多次修改其中文件,故建议选择易寻的路径建立文件夹)
比如我准备在路径:D:\Github\Nimnahc2020\hexo-next放入我的 Hexo 文件。进入新建好的hexo-next,右键单击选择Git Bash Here进入 Git 操作界面。输入命令:
输入后需稍等一会,若操作界面出现橙色的 WARN 没关系,只要不出现红色的 ERROR 就行。看到提示INFO Start blogging with Hexo! 即为 Hexo 初始化成功。
在哪个文件下执行了 hexo init,这个文件就是根目录
介绍下 Hexo 的三部曲:
1
2
3
4
| $ hexo clean // 清理缓存
$ hexo g // 生成静态文件
$ hexo d // 部署到 Github 上,若只是本地预览则把这一步换为 hexo s
注:hexo d 只有在安装部署插件 hexo-deployer-git 后才可实现
|
在根目录hexo-next下输入命令:
然后点开 http://localhost:4000/,若你面前出现了一个无比简陋的界面,那么恭喜你!你已经在本地搭建好一个博客了,接下来要做的就是部署博客并为你的博客挑选一个好看的主题。
此外,你还会发现根目录下多出来了 public 和 .gitignore 以及 db.json 三个文件。其中public存放了生成的页面,.gitignore 中记录的文件是 Git 命令上传博客源码至仓库的时被忽略上传的文件。db.json 则是 source 文件夹解析得到的。
在此建议记录下 Hexo 初始后生成哪些文件:
 1
 2
 3
 4
 5
 6
 7
 8
 9
10
11
12
13
| .
├── _config.yml // 站点配置文件
├── node_modules // 依赖包
├── package.json // 项目所需模块项目的配置信息
├── package-lock.json // 当前安装的库的具体来源和版本号
├── scaffolds // 命令生成文章等的模板
| └── draft.md
| └── page.md
| └── post.md
├── source // 用命令创建的各种文章
| └── _posts
└── themes // 主题
└── landscape
|
初始化后 Hexo 安装所具有的配置为:
 1
 2
 3
 4
 5
 6
 7
 8
 9
10
11
| "dependencies": {
"hexo": "^4.0.0",
"hexo-generator-archive": "^1.0.0",
"hexo-generator-category": "^1.0.0",
"hexo-generator-index": "^1.0.0",
"hexo-generator-tag": "^1.0.0",
"hexo-renderer-ejs": "^1.0.0",
"hexo-renderer-stylus": "^1.1.0",
"hexo-renderer-marked": "^2.0.0",
"hexo-server": "^1.0.0"
}
|
在之后在根目录下每安装一个插件(安装插件都要先到这个目录),package.json中便会更新出该插件的信息,插件的相关文件会放在node_modules文件中。建议记录下之后新增的插件信息及其功能。
网上有很多关于博客部署在 GitHub Pages 的教程,在此贴出两位大佬的文章:
这两篇文章的讲述都非常详细,大家可参照文中方法实现在 Github Pages 上的部署。
同时还是给出注意事项:
- GitHub 上创建的仓库名应为
username.github.io。username 为你的 GitHub 账号用户名。 repository有两种设置方式:- HTTPS 路径:
https://github.com/username/username.github.io.git - SSH 路径:
git@github.com:username/username.github.io.git
两种方法大概区别:Git 中 Https 和 SSH 的 clone 方式区别
Netlify 有很多优点:
- 具有静态网站托管的功能,能够托管 GitHub,GitLab 等网站上的 Jekyll,Hexo,Hugo 等静态网站。
- 自动启用 CDN 加速
- 实现持续集成(Continuous Integration,CI)和自动部署(当你提交改变到 Git 仓库,它就会自动运行
build command,进行自动部署)。 - 可以自定义域名
- 可以启用免费的通配符证书 + TLS 1.3,启用 HTTPS
- 自带 CI、支持自定义页面重定向、自定义插入代码、打包和压缩 JS 和 CSS、压缩图片、处理图片
- ......
Github 在国内的访问速度以前的确很慢,但近来 Github 表示要进入中国,访问速度虽说还是较慢,但也属于可接受的范围。网上也有很多通过 Netlify 加速 Github 的教程,而对于 Netlify 的访问速度,我感觉与在 Github Pages 部署时没太大区别,毕竟二者的服务器都不在国内。但由于有 PWA 功能,在访问时我感觉还挺不错,没有太大的卡顿延迟。
直接通过 Hexo 三部曲同样可以完成 Github + Netlify 的部署,这样做虽然方便,但这样只是将根目录下的public文件夹提交到了仓库,这样并不利于博客以后的维护、更新、开发,以及可能的开源开发。若要选择这种方法,可浏览这篇文章:Hexo + Github + Netlify 部署个人博客
接下来介绍直接通过提交根目录文件实现 Github + Netlify 的持续集成部署。
同样,首先在 Github 上新建一个仓库,这个仓库名可随意取,比如我取的是myblog。
接着把本地仓库上传至 Github 的myblog中,这里我采用的是 SSH 连接方式,相关方法可浏览我写的一篇文章:SSH 之 Github(单/多账号)。
先 Git 初始化根目录:(把根目录变成一个本地仓库→生成.git)
再连接远程仓库:
1
| $ git remote add origin git@WillCAI2020.github.com:WillCAI2020/myblog.git
|
然后提交本地仓库:
1
2
3
| $ git add .
$ git commit -m "first commit"
$ git push -u origin master
|
完成 Github 代码仓库的相关操作后,我们开始进行 Netlify 的相关操作。
登陆 Netlify,点击Sign in,选择 Github 并授权即可。
 ◎ 注册
◎ 注册
随后点击New site from Git,从中选则之前用来存储本地根目录文件的仓库。
 ◎ create new site
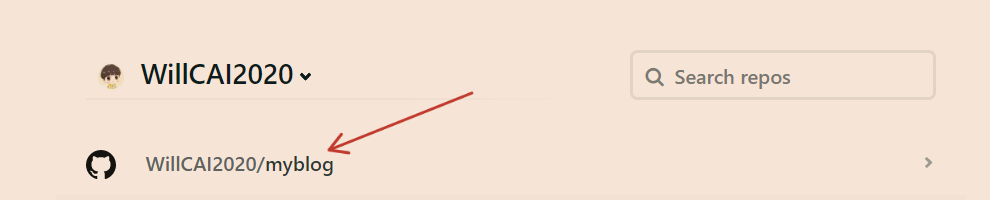 ◎ 选择仓库
最后一步即设置部署信息,Netlify 能自动识别出你的博客属于 Hexo 框架,故而Build command与Publish directory已自动填充好。其中Build command可根据博客实际情况设定,由于刚开始我们并未有什么插件命令需运行,故这里设置为hexo clean && hexo generate即可。
最后点击Deploy site,Netlify 将会对你的博客进行第一次部署,若出现错误,可根据部署日志中出错的相关提示寻找原因,自己无法解决则可谷歌出错信息。
部署完成后,Netlify 会自动给你随机生成一个很丑的域名,当然,这个域名是可修改的:
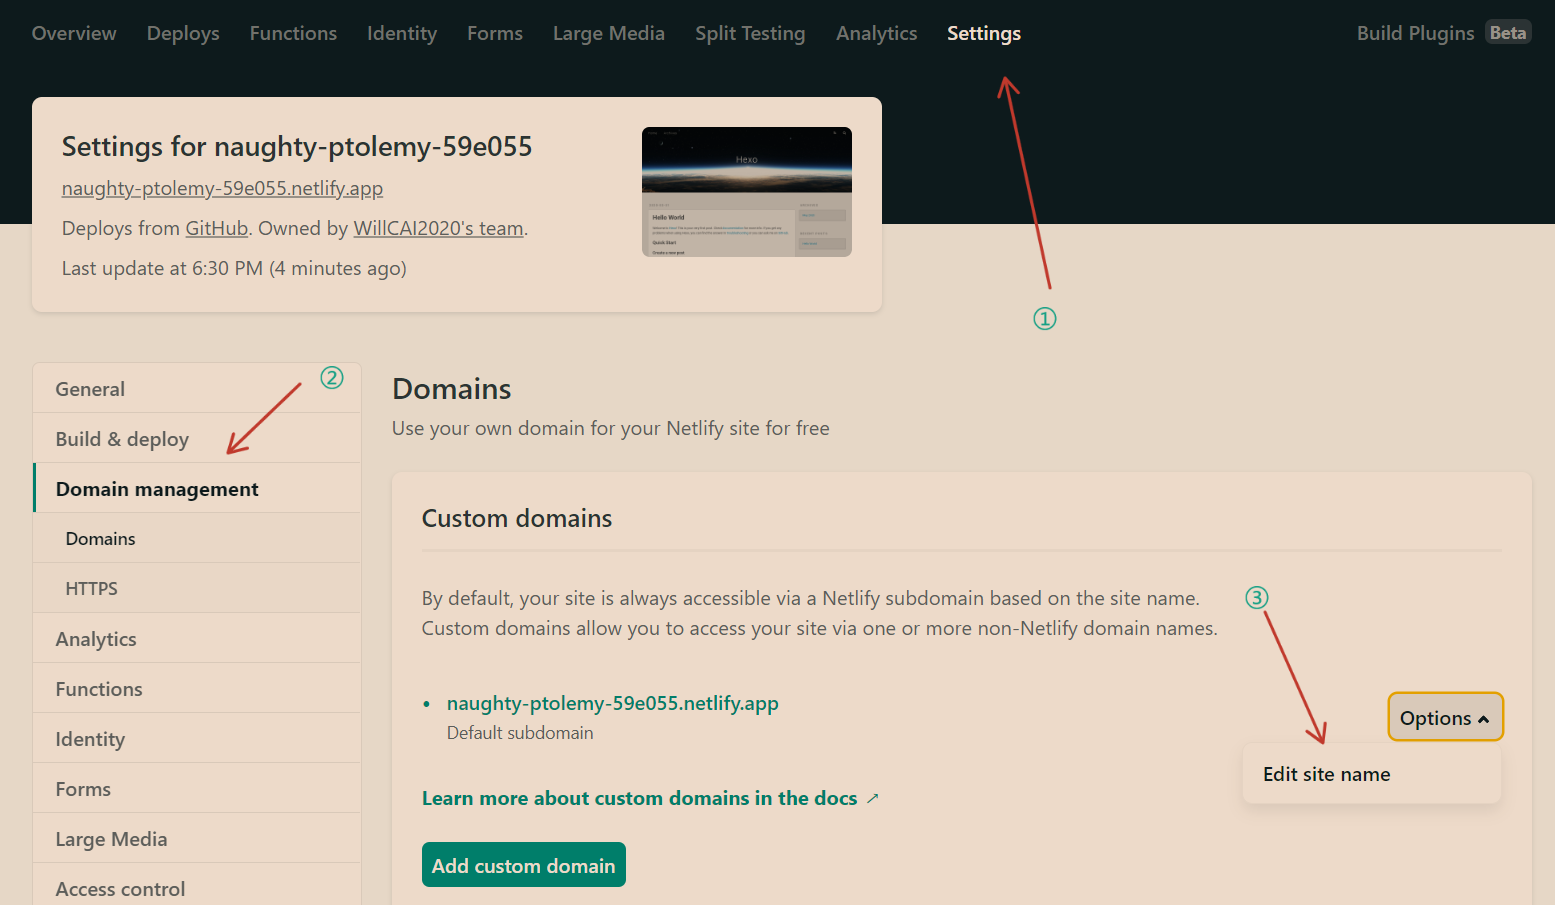 ◎ 修改域名
还可设置压缩 css,js,图片以加速访问:
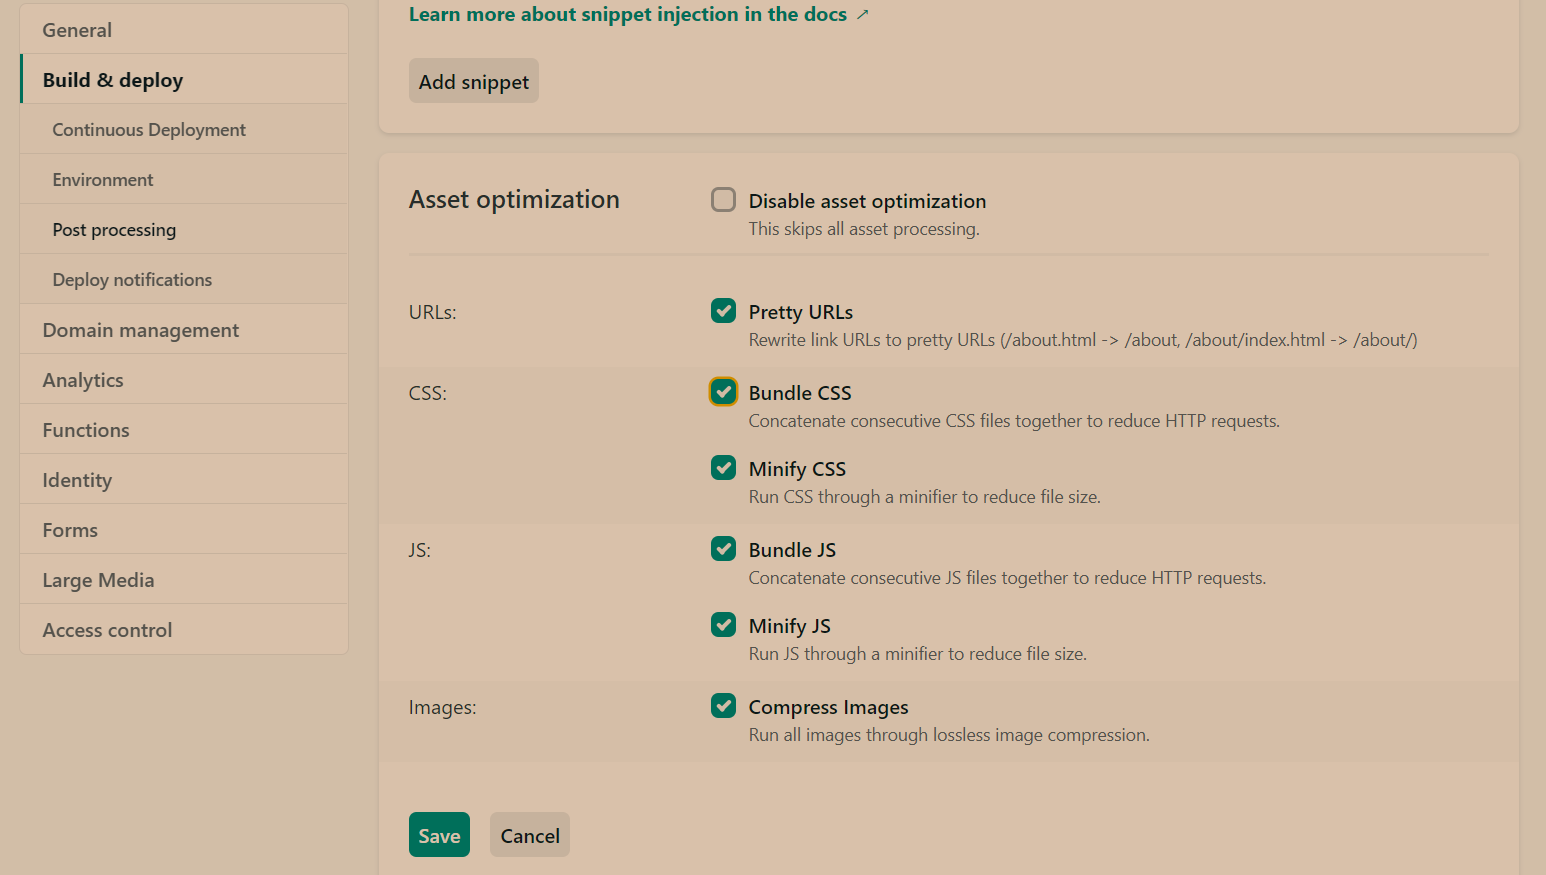 ◎ 压缩
◎ 压缩
到此为止,关于 Github + Netlify 部署的操作基本完成了,至于有关 HTTPS 功能则需要拥有个人域名才可完成相关设置。
Github 近来访问速度快了很多,个人感觉甚至比 Netlify 还要快😂。所以如果对博客的代码开源以及相关的修改记录没什么感觉的话,可以直接采用 Github Pages 部署博客。🙃
关于 Netlify 的深层次操作,可参考文章:
部署后即意味着别人能通过网址访问你的网站,接下来就应该将该网站的相关标识变成与你有关的了。
配置信息需要在根目录的的_config.yml文件中修改,作为站点配置文件,_config.yml有点像一个中央控制台,利用它可以实现主要信息的修改以及相关功能的开闭,故而对这个文件一定要重视。_config.yml文件相关配置我会在下面贴出来。
在网上很多教程中,都有提到分清站点配置文件以及主题配置文件,这两个文件名都是 _config.yml,只不过存放目录不同而已。
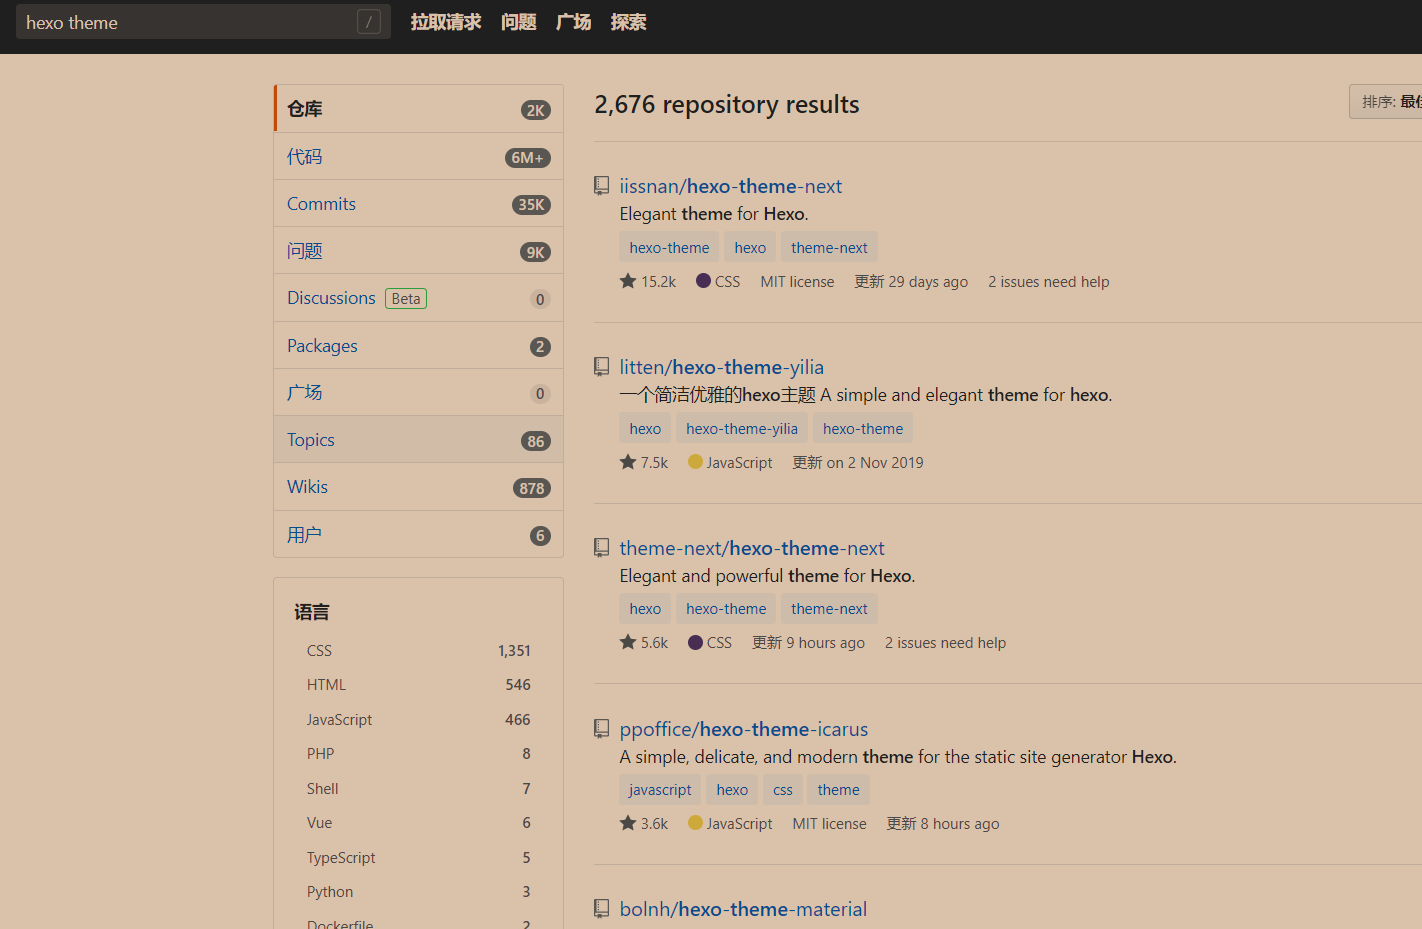
此外还要选出你心仪的主题,Hexo 支持的主题有很多,而起初 hexo init 后生成的 themes 文件夹下的 landscape 便是一种主题,若想寻找更多主题,可前往 Hexo themes 慢慢寻找。也可以前往 Github 搜索 hexo theme,从 stars 最多的开始浏览,直到找到你心仪的主题。
 ◎ hexo-themes
而在这我推荐 Hexo 博客选择 Next 主题,毕竟人家的背后是一个团队,主题不仅简洁还功能齐全,而且更新维护速度也快。
Next 主题在 Github 上有两个仓库。一个是 v 6.0.0 之前版本的个人仓库,而由于主题原作者停止维护该主题,所以有大佬们另起炉灶,联合创立了一个 NexT 团队,目前最新版本的主题便在这个仓库中。当然东西还是新的好,所以建议大家下载 Next 最新版本的主题。
下载方式有两种:
① 直接clone 主分支(master)的最新版本主题文件到 Hexo 的主题文件夹(themes)
由于 Next 主题经常更新,故建议利用子模块来添加 Next 主题,这样有利于跟进主题的更新。
1
| $ git submodule add --depth 1 https://github.com/next-theme/hexo-theme-next.git themes/next
|
执行完后会在 themes 文件家下生成 next 文件,next 文件中便存放着 Next 主题的所有相关文件。
② 到 Releases 中下载每月月初发布的发行版主题,将压缩文件中的内容解压至主题文件夹下的 next 文件夹中。
然后在根目录下新建.gitmodules文件,以设定themes文件夹下的 next 文件为子仓库,子仓库即为 NexT 主题的仓库:[submodule "themes/next"]。
安装完 Next 主题后,修改站点配置文件 _config.yml:
1
2
3
4
5
| # Extensions
## Plugins: https://hexo.io/plugins/
## Themes: https://hexo.io/themes/
- theme: landscape
+ theme: next
|
在根目录下的.git文件中找到config,增加以下内容:
1
2
3
| [submodule "themes/next"]
url = https://github.com/theme-next/hexo-theme-next.git
active = true
|
而这两方法究竟选哪种好,视自己喜好而定吧🤪。
此后主题便已经替换为了 next,且 themes 下的 landscape 文件夹可删除(毕竟主题也不是它了🙃)。
更新时建议直接把 next 文件删除,再重新git submodule add --depth 1 https://github.com/theme-next/hexo-theme-next.git themes/next。
自从 NexT-7.3.0 开始,官方推荐采用数据文件将配置与主题分离,这样我们可以在不修改主题源码的同时完成选项配置、自定义布局、自定义样式。故而我们对博客的各种优化将朝着以注入的方式完成。即站点下的文件内容能加入 Next 文件下相应文件的内容,这样便不用担心因大幅度修改主题文件而导致不易更新。
而关于博客的部分优化,网上的教程都和修改主题文件有关,而由于通过 git submodule 添加的主题,Git 仓库中的主题文件链接的是 Next 原仓库,而 Github Actions 只能通过仓库中的文件来完成部署,又本地子模块的相关修改也一直未被跟踪,始终处于 Changes not staged for commit 状态。关于 Git 我还是小白,也还没找到相关解决方法,这也坚定了本文内容全基于不改变主题文件的基础上😐。
请查阅 Hexo 官方文档,文档中有对站点配置各个参数非常详细的介绍。这里也贴出我的站点配置文件,可作为一参考。若对其中一些参数比较迷糊,可 Google 查找。当然也没必要全部看懂,把必须要设定的参数看懂即可。
注意:该文件内各项参数名称后的 : 为半角字符,其后需要一个空格再写内容。另外除非是已安装的插件需要在该文件进行一些参数的设定,否则不要随意添加或删除任何内容,因为这类操作可能会影响到博客的生成。
  1
  2
  3
  4
  5
  6
  7
  8
  9
 10
 11
 12
 13
 14
 15
 16
 17
 18
 19
 20
 21
 22
 23
 24
 25
 26
 27
 28
 29
 30
 31
 32
 33
 34
 35
 36
 37
 38
 39
 40
 41
 42
 43
 44
 45
 46
 47
 48
 49
 50
 51
 52
 53
 54
 55
 56
 57
 58
 59
 60
 61
 62
 63
 64
 65
 66
 67
 68
 69
 70
 71
 72
 73
 74
 75
 76
 77
 78
 79
 80
 81
 82
 83
 84
 85
 86
 87
 88
 89
 90
 91
 92
 93
 94
 95
 96
 97
 98
 99
100
101
102
103
104
105
106
107
108
109
110
111
112
113
114
115
116
117
118
119
120
121
122
123
124
125
126
| # 因为 hexo 版本不同,hexo init 得到的文件内容也会有所不同
# 本文件基于 Hexo version: v4.2.0,其他版本设置类似。
# Hexo Configuration
## Docs: https://hexo.io/docs/configuration.html
## Source: https://github.com/hexojs/hexo/
# Site
## 网站标题、副标题、网站描述、关键词、作者、语言等基本信息的配置
title: ruchan
subtitle: 'Just go'
description: '一个精神追求者'
keywords:
author: Ruchan
language: zh-CN
timezone: ''
# URL
## If your site is put in a subdirectory, set url as 'http://yoursite.com/child' and root as '/child/'
## 博客的网址及文章 URL 结构,默认在根目录
## 如果你想要将博客设定在一个子目录,如 'http://yoursite.com/blog',则将 root 设定为该子目录的名称 '/child/'
## 建议博客的 URL 结构在博客建立初期就规划好,因为当你写的文章被搜索引擎收录以及被读者收藏后,再更改结构,会对你的网站访问造成一定影响
url: http://crcrc.me/
root: /
## 详细参数请查看:https://hexo.io/zh-cn/docs/configuration.html#网址
## 这里默认的路径太不利于 SEO
## 可以考虑使用一些插件,直接生成永久链接,如 hexo-abbrlink 插件:https://github.com/rozbo/hexo-abbrlink;具体可查看本文 4.5节:文章永久链接
permalink: /posts/:rc/
permalink_defaults:
pretty_urls:
trailing_index: true # Set to false to remove trailing 'index.html' from permalinks
trailing_html: true # Set to false to remove trailing '.html' from permalinks
# Directory
## 这里是设定一些基本文件夹的名称,如资源文件夹等。
source_dir: source
public_dir: public
tag_dir: tags
archive_dir: archives
category_dir: categories
code_dir: downloads/code
i18n_dir: :lang
## skip_render 是为了避免在执行 'hexo generate' 命令后将一些你不想转义的文件转成 HTML 格式。
## 比如 README.md,你可以将这些文件名填写在括号内,格式为 [README.md, Post1.md, Post2.md]
skip_render:
- README.md
# Writing
new_post_name: :year/:title.md # File name of new posts
default_layout: post
titlecase: false # Transform title into titlecase
external_link:
enable: true # Open external links in new tab
field: post # Apply to the whole site or post
exclude: ''
filename_case: 0
render_drafts: false
## post_asset_folder 设置为 true 后,当你新建一个 post 的时候,会在同级目录生成一个相同名字的文件夹,结合插件hexo-asset-image可在文章内插入本地图片。
post_asset_folder: false
relative_link: false
future: true
## 代码高亮设置
highlight:
enable: true
line_number: true
## 代码自动高亮
auto_detect: false
tab_replace: ''
## 没看懂
wrap: true
hljs: false
# Home page setting
# path: Root path for your blogs index page. (default = '')
# per_page: Posts displayed per page. (0 = disable pagination)
# order_by: Posts order. (Order by date descending by default)
index_generator:
path: ''
per_page: 10
order_by: -date
# Category & Tag
default_category: uncategorized
## URL 中的分类和标签「翻译」成英文
## 参见:https://github.com/hexojs/hexo/issues/1162
category_map:
tag_map:
# Metadata elements
## https://developer.mozilla.org/en-US/docs/Web/HTML/Element/meta
## Meta generator 标签。值为 false 时 Hexo 不会在头部插入该标签
meta_generator: true
# Date / Time format
## Hexo uses Moment.js to parse and display date
## You can customize the date format as defined in
## http://momentjs.com/docs/#/displaying/format/
date_format: YYYY-MM-DD
time_format: HH:mm:ss
## Use post's date for updated date unless set in front-matter
use_date_for_updated: false
# Pagination
## Set per_page to 0 to disable pagination
per_page: 10
pagination_dir: page
# Include / Exclude file(s)
## include:/exclude: options only apply to the 'source/' folder
## 详细说明见:https://hexo.io/zh-cn/docs/configuration.html#包括或不包括目录和文件
include:
exclude:
ignore:
# Extensions
## Plugins: https://hexo.io/plugins/
## Themes: https://hexo.io/themes/
theme: next
# Deployment
## Docs: https://hexo.io/docs/deployment.html
## Dependency: https://github.com/hexojs/hexo-deployer-git
## 设定执行 'hexo deploy' 命令后提交的代码仓库地址
## 这里由于我直接用 Netlify 部署,且没安装hexo-deployer-git,故而未设置该项
deploy:
type: ''
|
之前提过,next 文件中的内容尽量不要修改,对此 Next 也提出了相关的解决方法:
- 方法一
- 从主题的
/themes/next/_config.yml 文件中复制你需要的 NexT 配置项到 /_config.yml 中: - 所有这些配置项右移两个空格(在 Notepad ++ 中:选中这些文字,
TAB 键即可缩进两格) - 在这些参数最上方添加一行
theme_config:
- 方法二
- 在
根目录/source/_data 目录中创建 next.yml(如果_data 不存在,则创建目录) - 在
next.yml 设置 override 选项为 true - 将 主题配置文件内容复制到
根目录/source/_data/next.yml 中(也可以只复制你想改动的配置,但此时应为 override: false)
参考文章:
两种方法视实际情况选其一即可。
这里以方法一为例:
 1
 2
 3
 4
 5
 6
 7
 8
 9
10
11
12
13
| theme_config:
override: false
# Console reminder if new version released.
reminder: false
# Allow to cache content generation. Introduced in NexT v6.0.0.
cache:
enable: true
# Remove unnecessary files after hexo generate.
minify: false
.....
|
因主题配置文件太长,故在此只展现一部分,完整的配置文件请前往代码仓库获取。
由于 NexT 主题有很多扩展功能,故其配置文件内容有很多,所以本文也只展示有关优化的相关配置。具体参数介绍请查看官方文档(英文说明),进行其他设置时遇到问题,可采用 Google 大法。对于更新主题后的变动,可浏览这个官方文档获悉相关设置。
Next 展现出了四种外观,在配置文件 _config.yml 中找到以下设定:
1
2
3
4
5
| # Schemes
#scheme: Muse
#scheme: Mist
#scheme: Pisces
scheme: Gemini
|
选哪个外观便把前面的 # 注释去掉,注意只能选一个外观。我这里选择了第四个 Gemini。
到根目录下的站点配置文件,配置以下参数:
1
2
3
4
5
6
7
| title: # 网站标题
subtitle: # 网站副标题
description: # 描述,介绍网站的
keywords: # 网站关键字
author: # 作者
language: zh-CN # 语言:zh-CN 是简体中文
timezone: # 时区
|
默认配置的 permalink 中的title,当为汉字时,经转义会变得很长(如此才能保证当你改变文章名时,链接始终是有效的→论临时链接与永久链接🙃),而且你分享得到的文章链接也会很长很难看,这也不利于网站的 SEO(搜索引擎优化)。所以我们有必要优化一下这个。
在此提供两个方法:
① 方法一:
修改该配置为:permalink: /posts/:rc/ ,当然可据个人喜好设定,posts 与 rc 均可替换为其它英文或..数字..,且在文章的Front-matter部分加上rc: 1,其中1也可为其它字母或数字,具体设置自行调整。
② 方法二:
利用插件 hexo-abbrlink。根目录下运行命令:
1
| $ npm install --save-dev hexo-abbrlink
|
安装好后修改站点配置文件:
1
2
3
4
5
| permalink: archives/:abbrlink.html
abbrlink:
alg: crc32 # 算法:crc16(default) and crc32
rep: hex # 进制:dec(default) and hex
permalink_defaults:
|
模板储存在 scaffolds 文件夹下,分别有 draft(草稿模板)、page(页面模板) 以及 post(文章模板)。
当我们运行:
1
2
| $ hexo new post "文章名"
// 生成的文章文件会在 source 的 _posts 内,当然也可以指定路径(设定 new_post_name 参数)
|
我们通常是修改模板文件中 front-matter 内的参数来取得方便。比如我们大部分文件都要添加某个参数时,我们便可以把它加在模板里。
以上小节的 permalink 为例,我在文章模板里加上 rc: 后,每次生成后的文章均只需要填写相关参数配置。
附上我的文章模板:
1
2
3
4
5
6
7
8
9
| ---
title: {{ title }}
date: {{ date }}
top: false
rc:
summary:
tags:
categories:
---
|
Next 需要一个文档对菜单等进行中文翻译,以前我们需修改主题下的 languages 目录中的 zh-CN.yml,但现在我们可以通过在 根目录/source/_data/ 下新建文件 languages.yml( _data 文件夹需自己建喔):
 1
 2
 3
 4
 5
 6
 7
 8
 9
10
11
12
13
14
15
16
17
18
| zh-CN:
menu:
home: 首页
archives: 归档
categories: 分类
tags: 标签
about: 关于
links: 友情链接
search: 搜索
schedule: 日程表
sitemap: 站点地图
commonweal: 公益 404
reward:
donate: <i class="fa fa-qrcode fa-2x" style="line-height:35px;"></i>
wechatpay: 微信支付
alipay: 支付宝
bitcoin: 比特币
|
具体可据自身需要修改增添。
找到配置并据实际情况修改图片路径或图片名:
1
2
3
4
5
| favicon:
small: /images/favicon-16x16.png
medium: /images/favicon-32x32.png
apple_touch_icon: /images/apple-touch-icon.png
safari_pinned_tab: /images/safari-pinned-tab.svg
|
可前往这个网站生成对应图片,然后把图片放入 根目录/source/images/ 目录下(没有则新建文件夹),: 后的路径即为存放图片的路径。
在配置文件里找到以下内容并依据个人需要配置:
 1
 2
 3
 4
 5
 6
 7
 8
 9
10
11
12
13
14
15
16
17
18
19
20
21
22
23
24
25
26
27
28
29
| footer:
# Specify the date when the site was setup. If not defined, current year will be used.
since: 2019 # 年份
# Icon between year and copyright info.
icon:
# Icon name in Font Awesome. See: https://fontawesome.com/icons
name: fa fa-heart # 图标
# If you want to animate the icon, set it to true.
animated: true # 图标动画效果
# Change the color of icon, using Hex Code.
color: "#ff0000" # 图标颜色
# If not defined, `author` from Hexo `_config.yml` will be used.
copyright: ruchan # 作者信息
# Powered by Hexo & NexT
powered: true # 是否显示 Hexo 及其版本、NexT 及其版本
# Beian ICP and gongan information for Chinese users. See: http://www.beian.miit.gov.cn, http://www.beian.gov.cn
beian: # 备案信息
enable: false
icp:
# The digit in the num of gongan beian.
gongan_id:
# The full num of gongan beian.
gongan_num:
# The icon for gongan beian. See: http://www.beian.gov.cn/portal/download
gongan_icon_url:
|
关于页脚自定义可看关于自定义的小节部分。
 1
 2
 3
 4
 5
 6
 7
 8
 9
10
| # 菜单设置为 菜单名: /菜单目录 || 菜单图标名字
menu:
home: / || fa fa-home
#about: /about/ || fa fa-user
#tags: /tags/ || fa fa-tags
#categories: /categories/ || fa fa-th
#archives: /archives/ || fa fa-archive
#schedule: /schedule/ || fa fa-calendar
#sitemap: /sitemap.xml || fa fa-sitemap
#commonweal: /404/ || fa fa-heartbeat
|
菜单栏默认有「首页」与「归档」页面(注释掉也无法取消😂)。当需要添加某一页面时,去掉其前的注释即可。目录相应的翻译可前往 languages.yml 配置。
Hexo 所有图标均来自 Font Awesome,其中 || 后面是你想要设置的图标的名字。
然后还要生成对应文件,以标签页面与分类页面为例,根目录下:
1
2
| $ hexo new page tags
$ hexo new page categories
|
然后 source 文件夹中生成了对应名称的文件夹,在该文件夹下会有一个 index.md 文件,打开该文件,在如下所示位置添加内容:
1
2
3
4
5
| ---
title:
+ type: "tags or categories"
comments: false
---
|
type 即指名该页面的类型,主题会根据类型对页面进行渲染,前提是 NexT 主题支持你设定的这种类型。不同类型格式的模板存放在 ~/themes/next/layout/ 文件夹下。
对于自定义的 type,由于是使用子模块放置的主题文件,故而修改或存放页面模板文件在 /themes/next/layout/ 下并无法起作用。
当你感觉侧栏目录太多而感觉不好看时,可以尝试一下多级目录。具体实现效果可看我的博客文章总览界面。
设置方法即在一级目录下,进一步配置二级目录,以如下修改为例:
1
2
3
4
5
6
7
8
| menu:
home: / || fa fa-home
- tags: /tags/ || fa fa-tags
- categories: /categories/ || fa fa-th
+ all:
default: /all/ || fas fa-th
tags: tags/ || fas fa-tags
timeline: timeline/ || fas fa-archive
|
其中 default 为目录 all 页面的默认名称。之后的 tags 与 timeline 才属于次级目录。
同样还得创建相应的文件,方法如上节。
介绍下成果:在 all 对应的 index.md 设置了 type: catrgories,tags 和 timeline 也分别采用了标签和归档界面的类型。如此算是完成了将分类、标签、归档三个目录归于一个目录下,当然主目录是分类。
同理,创建三级目录时,需将对应的二级目录默认页面改为 default,然后在同级下添加同样格式的内容,在此不再赘述。
关于边栏的位置设定,以及一些边栏展示内容的设定,如头像、社交图标、社交链接可设置:
 1
 2
 3
 4
 5
 6
 7
 8
 9
10
11
12
13
14
15
16
17
18
19
20
21
22
23
24
25
26
27
28
29
30
31
32
33
34
35
36
37
38
39
40
41
42
43
44
45
46
47
48
49
50
51
52
53
54
55
56
57
58
59
60
61
62
63
64
65
66
67
68
69
70
71
72
73
74
75
76
77
78
79
80
81
82
83
84
85
86
87
88
89
90
91
92
93
| sidebar:
# Sidebar Position.
position: left # 侧边栏位置
#position: right
# Manual define the sidebar width. If commented, will be default for:
# Muse | Mist: 320
# Pisces | Gemini: 240
#width: 300
# Sidebar Display (only for Muse | Mist), available values:
# - post expand on posts automatically. Default.
# - always expand for all pages automatically.
# - hide expand only when click on the sidebar toggle icon.
# - remove totally remove sidebar including sidebar toggle.
display: post
# Sidebar padding in pixels.
padding: 18
# Sidebar offset from top menubar in pixels (only for Pisces | Gemini).
offset: 12
# Enable sidebar on narrow view (only for Muse | Mist).
onmobile: false
# Sidebar Avatar
# 设置头像
avatar:
# Replace the default image and set the url here.
url: /images/avatar.jpg # 头像图片存放路径
# If true, the avatar will be dispalyed in circle.
rounded: false # 头像是否展示为圆形
# If true, the avatar will be rotated with the cursor.
rotated: false # 是否旋转
# Posts / Categories / Tags in sidebar.
# 侧边栏需要展示的链接,博客内部链接,文章、归档等是否显示
site_state: false
# Social Links
# Usage: `Key: permalink || icon`
# Key is the link label showing to end users.
# Value before `||` delimiter is the target permalink, value after `||` delimiter is the name of Font Awesome icon.
# 设置社交信息,配置与菜单栏一样:社交名字: 社交url || 社交图标
social:
#GitHub: https://github.com/yourname || fab fa-github
#E-Mail: mailto:yourname@gmail.com || fa fa-envelope
#Weibo: https://weibo.com/yourname || fab fa-weibo
#Google: https://plus.google.com/yourname || fab fa-google
#Twitter: https://twitter.com/yourname || fab fa-twitter
#FB Page: https://www.facebook.com/yourname || fab fa-facebook
#StackOverflow: https://stackoverflow.com/yourname || fab fa-stack-overflow
#YouTube: https://youtube.com/yourname || fab fa-youtube
#Instagram: https://instagram.com/yourname || fab fa-instagram
#Skype: skype:yourname?call|chat || fab fa-skype
social_icons:
enable: true
icons_only: false
transition: false
# Blog rolls
# 友链配置
links_settings:
icon: fa fa-link
title: Links
# Available values: block | inline
layout: block
links:
#Title: http://yoursite.com
# Table of Contents in the Sidebar
# Front-matter variable (unsupport wrap expand_all).
# 设置文章目录
toc:
enable: true
# Automatically add list number to toc.
number: true
# If true, all words will placed on next lines if header width longer then sidebar width.
wrap: false
# If true, all level of TOC in a post will be displayed, rather than the activated part of it.
expand_all: false
# Maximum heading depth of generated toc.
max_depth: 6
# A button to open designated chat widget in sidebar.
# Firstly, you need enable the chat service you want to activate its sidebar button.
# 添加聊天窗口,需要选择相应的服务
chat:
enable: false
#service: chatra
#service: tidio
icon: fa fa-comment # Icon name in Font Awesome, set false to disable icon.
text: Chat # Button text, change it as you wish.
|
这里设置出的友链是由于位于边栏内,友链一多就不好看了。
# Automatically excerpt description in homepage as preamble text.
# 自动选取文章开头文字作为文章摘要
excerpt_description: false

# Read more button
# If true, the read more button will be displayed in excerpt section.
# 是否开启阅读全文按钮
read_more_btn: false
我们可以在文章中加入 <!-- more --> 来自己选择文章摘要,<!-- more --> 前面的文字即作为摘要。
文章元数据即为文章标题下的写作及更新时间、分类信息、字数统计等信息。
同样的在配置文件中找到并修改:
 1
 2
 3
 4
 5
 6
 7
 8
 9
10
11
12
13
14
15
| # Post meta display settings
post_meta:
item_text: true
created_at: true # 显示创建时间
updated_at:
enable: true # 显示修改时间
another_day: true # 设为true时,若创建时间和修改时间一致则显示一个时间
categories: true # 显示分类信息
# Post wordcount display settings
# Dependencies: https://github.com/theme-next/hexo-symbols-count-time
symbols_count_time:
separated_meta: true
item_text_post: true # 显示属性名称,设为false后只显示图标和统计数字,不显示属性的文字
item_text_total: false # 底部footer是否显示字数统计属性文字
|
其中 symbols_count_time 配置的是文章字数与阅读时长统计的信息。这个配置需要安装 hexo-symbols-count-time 插件才可使用,具体可浏览该插件的说明文档。
 1
 2
 3
 4
 5
 6
 7
 8
 9
10
11
| reward_settings:
# If true, reward will be displayed in every article by default.
enable: true # 是否开启打赏设置
animation: false # 是否设置文字动态
comment: 🥤 赏杯饮料~ # 打赏描述
reward:
wechatpay: /images/wechatpay.png # 微信支付二维码图片地址
alipay: /images/alipay.png # 支付宝二维码图片地址
#paypal: /images/paypal.png # 贝宝二维码图片地址
#bitcoin: /images/bitcoin.png # 比特币二维码图片地址
|
1
2
| # Use icon instead of the symbol # to indicate the tag at the bottom of the post
tag_icon: true
|
 1
 2
 3
 4
 5
 6
 7
 8
 9
10
11
12
| codeblock:
# Code Highlight theme
# Available values: normal | night | night eighties | night blue | night bright | solarized | solarized dark | galactic
# See: https://github.com/chriskempson/tomorrow-theme
highlight_theme: night bright # 代码块主题
# Add copy button on codeblock
copy_button:
enable: true # 增加复制按钮开关
# Show text copy result.
show_result: true # 点击复制完后是否显示「复制成功」结果提示
# Available values: default | flat | mac
style: mac # 代码块风格
|
持续更新中!!!